Table of Contents
Online Help > AlpineQuest 2.x > Maps & Layers > How to store a complete map area for offline use?
How to store a complete map area for offline use?
Before starting, be sure to have at least one on-demand map displayed. If you want to store more than one map at the same time, you can add the other maps as layers.
The store area tool will download all the map data for the area and zoom levels you have chosen, and store it on the device. The downloaded data is added into the single storage of its map. Any data already stored won't be downloaded or stored twice. At any time, you can check what is stored for a map, or delete its entire data storage.
![]() Storing areas extensively uses map servers, be sure to only store areas you need.
Storing areas extensively uses map servers, be sure to only store areas you need.
![]() Some map servers limit the amount of accessible data per day and per user (using IP address), storing large areas increase the risk of reaching the amount limit.
Some map servers limit the amount of accessible data per day and per user (using IP address), storing large areas increase the risk of reaching the amount limit.
Configure the area and the zoom levels to store
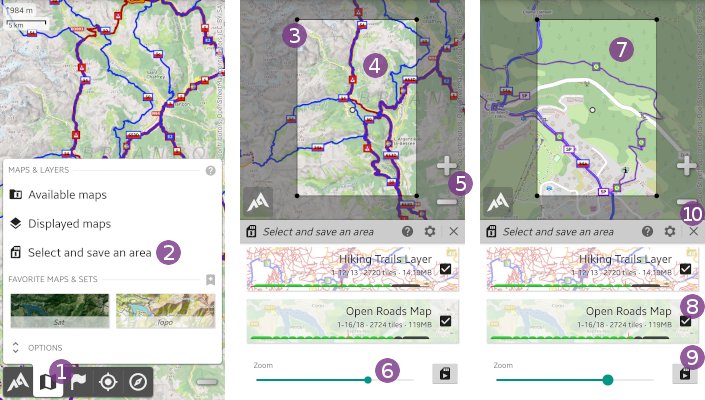
- Tap on the “
Maps & Layers” menu and on “
Select and save an area” ;
; - Adjust the area to store by moving the dots
 , the map
  and the zoom level
  ;
; - Select the maximum zoom level to store1
 . When modifying the maximum level to store, this one is previewed on the map
  . Just release the zoom slider to return the map zoom to its original value;
 - If needed, un-check
 the maps you don't want to store;
 - For each map, an estimation of the number of image tiles and size to be downloaded2 is displayed;
- Tap on “
Start” to start the store area process. At any time you can tap on “
Close” to hide the store area side side view, the process will continue in the background.
![]() You can only download a limited amount of data at each storage process. When you've reach this amount for a map, the levels bar turns red. You can however re-start the process as many times as you want, all the data already stored won't be downloaded again.
You can only download a limited amount of data at each storage process. When you've reach this amount for a map, the levels bar turns red. You can however re-start the process as many times as you want, all the data already stored won't be downloaded again.

1. On-demand maps are raster maps: each zoom level is composed by its own set of images containing different details, that's why all levels must be stored independently.
2. The size is an estimation based on the data already stored for this map.
Checking the process
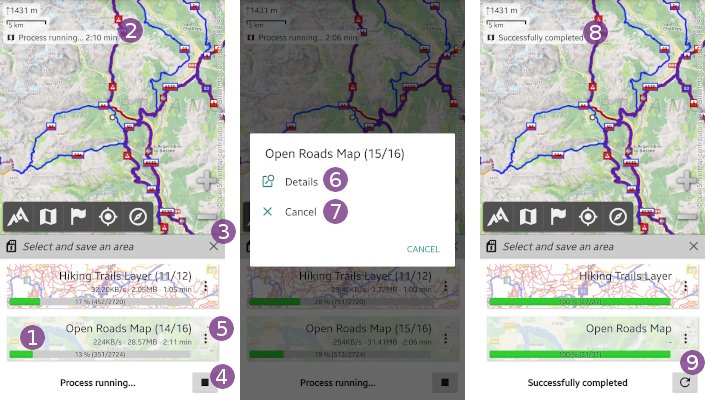
Once the process has been started, the progress of each maps is displayed ![]() in the side view. The estimated remaining total time is displayed in an information box on the map
in the side view. The estimated remaining total time is displayed in an information box on the map ![]() .
.
![]() At any time you can tap on “
At any time you can tap on “Close” ![]() to hide the download progress side panel and continue to use the application as usual (move the map, select an other map, etc.), the download process will continue in the background.
to hide the download progress side panel and continue to use the application as usual (move the map, select an other map, etc.), the download process will continue in the background.
If you want to cancel the store area process, tap on the “Stop” ![]() icon.
icon.
By tapping on the “Menu” ![]() icon of a map, you can:
icon of a map, you can:
- Tap “
Details” to display more information about the selected map process, including the list of errors if any;
 - Tap “
Cancel” to stop the store area process for this map only.
When the store area process is terminated, the information box is updated ![]() . If you want to re-display the store area tool with the same settings again, tap on the “
. If you want to re-display the store area tool with the same settings again, tap on the “Start new” ![]() icon.
icon.

Updating a map area
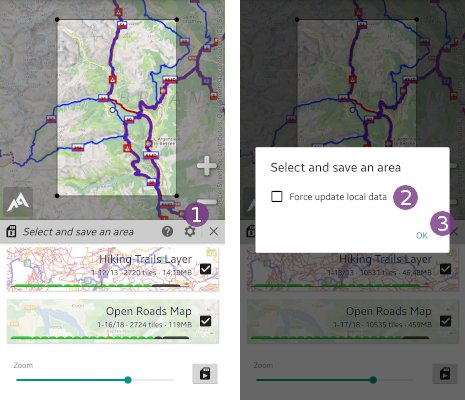
Stored map data is automatically updated when being displayed again after some time, usually between one and three months depending on the map. However, it is possible to force the application to update the stored data of an area using the store area tool:
- Before storing an area, tap on “
Settings” ;
; - Check the “
Update data already stored” option;
 - Tap “
Ok” to validate.
![]() This option is automatically un-checked on the next process.
This option is automatically un-checked on the next process.

