This is an old revision of the document!
Table of Contents
Online Help > AlpineQuest 2.x > Maps & Layers
Digital Elevation Model (DEM)
The application is able to download and store elevation values of remote locations and let you use them in various ways, even while being offline.
Those elevations come from various sources including the SRTMGL1(v3) database and are currently available between latitude 56°S and 60°N with a precision of 1 arc second.
How to activate the use of elevation values?
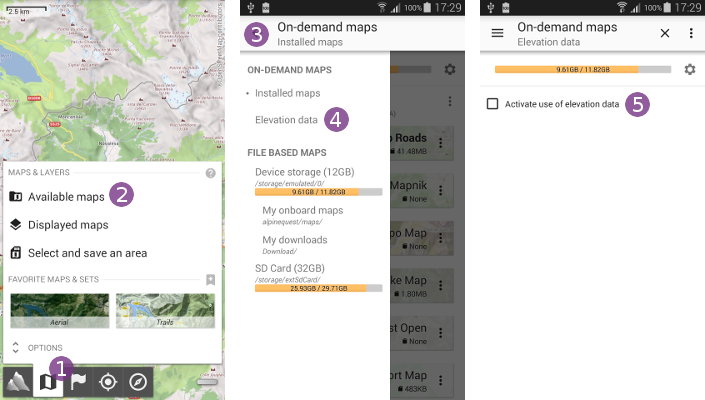
To activate the use of elevation values:
- Tap on the
“Maps”menu and on
 “Available maps” ;
; - Tap on the top left menu
 and on
 “Elevation data” ;
; - Check
“Activate use of elevation data” .
.

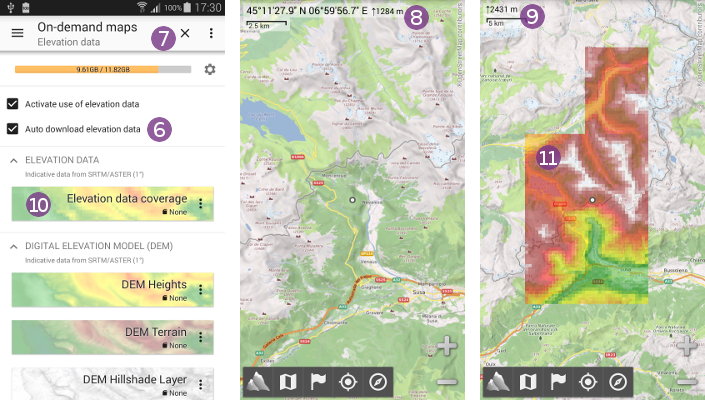
Be sure to also check “Auto download elevation data” ![]() so the application automatically downloads needed areas from our servers. If you want to use your own elevation data (see below), then un-check this option.
so the application automatically downloads needed areas from our servers. If you want to use your own elevation data (see below), then un-check this option.
Close the maps explorer by tapping on ![]() . As you move the map, the elevation of the screen center point is given along with its coordinates.
. As you move the map, the elevation of the screen center point is given along with its coordinates.
![]() Be sure to have the screen center coordinates displayed.
Be sure to have the screen center coordinates displayed.

How to check the coverage of stored data?
You can visualize the coverage of stored elevation values by displaying the coverage layer:
- Click on the
“Maps”menu and on
 “Available maps” ;
; - Click on the top left menu icon
 to display the left drawer menu;
 - Select
“Elevation data” in the left drawer menu;

- Select the
“DEM storage visualization”layer .
.
Stored areas will be displayed over the current map ![]() .
.

How to get elevation profiles of paths?
When manually drawing a path or automatically drawing a path along roads over an area with elevation values stored, you can get the elevation profile and gain of that path:
- Click anywhere on the path
 and select its name
  ;
; - Select
“Details” and check the
 “Statistics” part.
part.

How to use your own DEM data files?
If you don't want to use DEM values automatically downloaded by the application, you can use your own files. As long as the application finds the elevation data it needs, nothing will be downloaded.
You must use DEM files in the “.HGT format” (either 1201 or 3601 values per lines), following the usual rules:
- File names must follow the .HGT naming convention;
- Files containing 1201×1201 values (3″) must have a size of
“2,884,802 bytes”; - Files containing 3601×3601 values (1″) must have a size of
“25,934,402 bytes”;
The files must be copied inside the sub-folder “/cache/dem/” of the application folder (the same folder used by the application to store the downloaded elevation data).
![]() If your own data doesn't cover a requested area, the application will automatically download the missing data in its own format which may interfere with your own data. You can completely turn off the automatic download of data using the user setting
If your own data doesn't cover a requested area, the application will automatically download the missing data in its own format which may interfere with your own data. You can completely turn off the automatic download of data using the user setting “maps.features.elevations.auto_download=false”.
