Table of Contents
Online Help > Placemarks > Details and statistics
Details and statistics
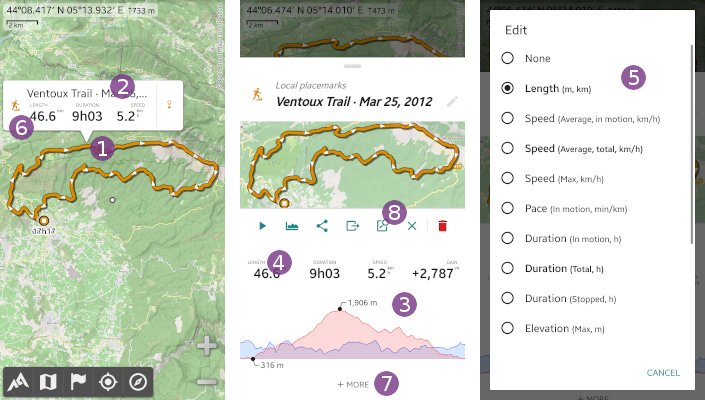
Statistics are given in the details page of placemarks.
To display the details page, tap on any track displayed on the map ![]() and on its name
and on its name ![]() to display placemark menu.
to display placemark menu.
The most important information and graphics are displayed in the placemark menu ![]() . If you're interested in other information, you can long-press any data field
. If you're interested in other information, you can long-press any data field ![]() and select another information
and select another information ![]() .
.
![]() The first three data fields are also displayed in the placemark popup
The first three data fields are also displayed in the placemark popup ![]() .
.
In order to display the complete statistics, tap on “More” ![]() or on the
or on the “Details” ![]() shortcut icon.
shortcut icon.
Statistics
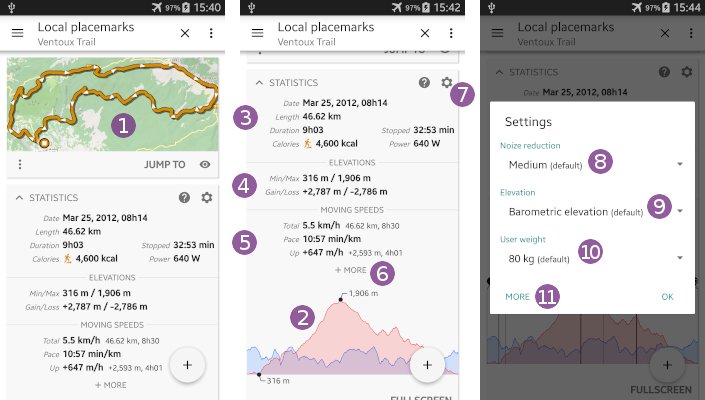
The details page contains a preview of the track on the default map ![]() , an elevation and speed profile
, an elevation and speed profile ![]() , as well as various statistics listed in three sections:
, as well as various statistics listed in three sections:
- The overall statistics section
 contains
 “Date”(the start date and time),“Length”(the total length),“Duration”(the total time elapsed between the start and the end times),“Stopped”(the total time stopped, sum of rest time of all breaks),“Calories”(estimation based on the activity, length, speed, inclines and user weight) and“Power”(developed effort quantity); - The elevations section
 contains
 “Min/Max”(the overall minimum and maximum elevations) and“Gain/Loss”(the cumulative elevation gain and loss, see below for more details); - Moving speeds section
 (ignores parts with no movement) contains
 “Total”(the total mean speed while moving, along with the total length and duration while moving),“Pace”(the total mean pace while moving) and“Up”(the ascent speed, along with the total ascent and duration while going uphill).
![]() Click on
Click on “More” ![]() to get even more statistics and details.
to get even more statistics and details.
In order to change how statistics are computed, tap on the statistics settings icon ![]() :
:
“Noise reduction” defines how much to filter noises and erroneous values before computing statistics. It mainly impacts the gain computation (see below for more details);
“Elevation” defines which elevations to use (if there selected elevations are not available, the other type will be used);
“User weight” defines the weight to use when computing calories, energy and power;
- Tap
“More” to change the
 “Moving threshold”, the minimum speed at which the user is considered as moving.
Graphics
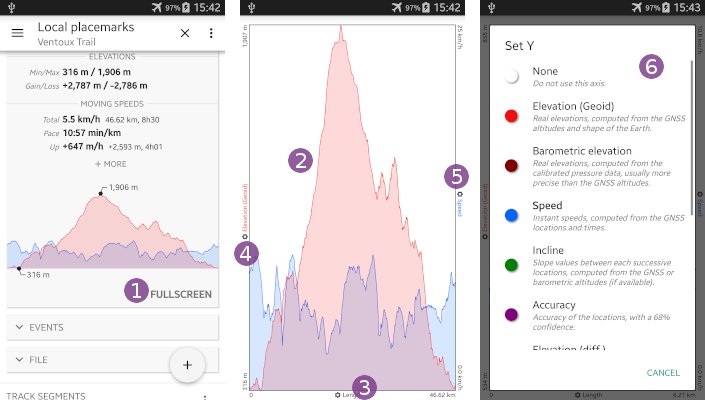
The statistics details page gives a static preview of the elevation and speed profile. In order to get a fullscreen and dynamic version, tap on “Fullscreen” ![]() . On the fullscreen page, you can:
. On the fullscreen page, you can:
- Tap anywhere on the profile
 to get the exact values at this location;
 - Tap on the bottom setting icon
 to change the abscissa to
 “Length”,“Time”,“Time (in motion)”or“Date”; - Tap on left
 or right
  setting icon to change one of the ordinates. The list of available fields
  depends on the data included in the track file.
Events
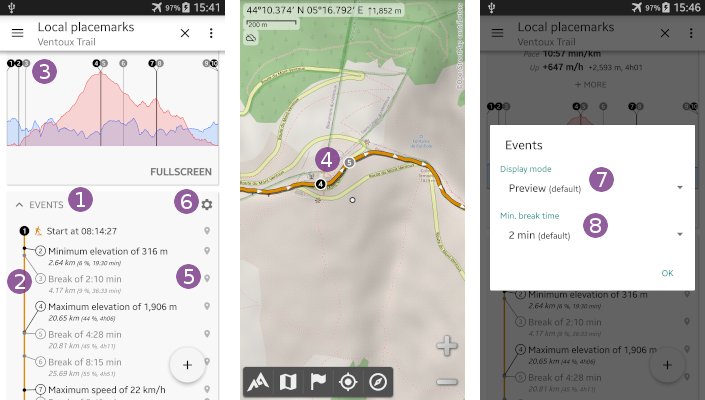
The “Events” ![]() section list various events along the track: pictures and waypoints in blue, breaks in gray, minimum, maximum elevations and maximum speed (in black).
section list various events along the track: pictures and waypoints in blue, breaks in gray, minimum, maximum elevations and maximum speed (in black).
Each event has an unique number which is displayed on the track progress line ![]() , on the elevation and speed preview profile
, on the elevation and speed preview profile ![]() , and on the map at higher zoom scales
, and on the map at higher zoom scales ![]() .
.
![]() Tap on the event location icon
Tap on the event location icon ![]() to display this event location on the map.
to display this event location on the map.
In order to change how events are displayed, tap on the events settings icon ![]() :
:
“Display mode” changes how events are displayed, either
 “Preview”(display all events on a graphical progress line),“Waypoints”(only display waypoints on a graphical progress line and ignore times, good for plannings) or“List”(display all events as a simple list);“Min. break time” change the minimum time break events must have to be displayed.
How to export statistics and graphics data?
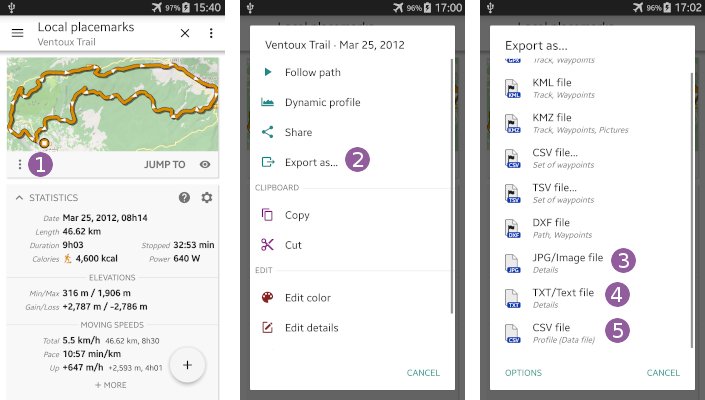
You can export the statistics as either an image, a text file, or a data file containing the raw data used to compute statistics and graphics:
- Tap on the menu icon
 under the track preview;
 - Choose
“Export as…” ;
; - Choose
“JPG/Image file - Details” to export the details page as an image;
 - Choose
“TXT/Text file - Details” to export the details page as a text file;
 - Choose
“CSV file - Profile (Data file)” to export the statistics raw data (be careful not to choose
 “CSV file - Set of waypoints”).
![]() After the export, you can easily share/upload the generated file using the
After the export, you can easily share/upload the generated file using the “Share” button.
![]() See more details here on how to export placemarks.
See more details here on how to export placemarks.
Gain and loss computation
The gain is an important value that helps to appreciate the overall profile of a track. A small gain means that the track is mostly flat, a high gain means you'll have to climb a lot.
Strictly speaking,
- The gain is the sum of all positive altitude differences along the track;
- The loss is the sum of all negative altitude differences along the track.
In order to compute these values, it's important to define more precisely what means “along the track”.
A first definition would be to only take into account the altitude differences between mountain passes and summits. If you start a hike at +150m, climb to a summit at +500m, then go back to your start location at +150m, your gain will be 350m. In practice, trails usually don't go straight forward to the summit, but will go uphill for some time, then downhill a little bit, then uphill again, etc. This first definition doesn't take all these small changes into account, and will then lead to an under-estimated gain.
Another definition would then be to take into account the altitude differences between all the locations that make the track. Now imagine a track recorded with a GPS along the sea. The GPS, having an imperfect accuracy, will record altitudes of [+1m, +2m, 0m, +1m, -1m, +2m, …]. With this small segment of 6 locations, we have a gain of +5m. With a track of 1000 locations, it would lead to a gain of more than +800m which is a very over-estimated gain, since the track is along a flat shoreline and should have no gain.
At then end, the “perfect” gain definition would be something between these two ones. In order to compute the best gain approximation, the application will first remove noises from the track (including the GPS inaccuracy) to create a smoother altitude profile, and then compute the gain based on each location altitudes.
![]() You can disable or increase the noise reduction amount in the statistics settings (see above).
You can disable or increase the noise reduction amount in the statistics settings (see above).
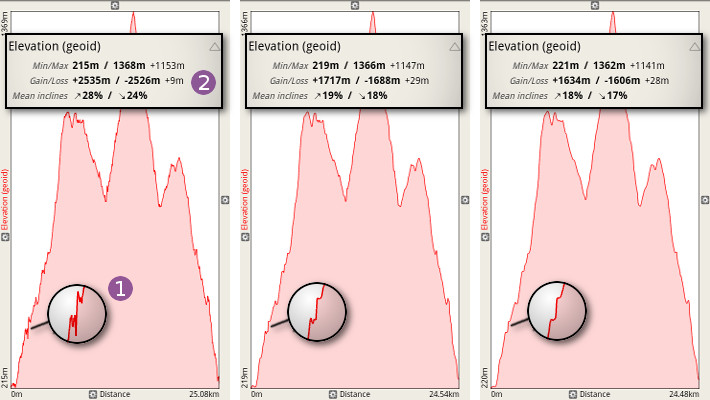
Here is the effect of the noise reduction on a track profile and gain computation:
- On the left, the noise reduction is disabled. The profile displays the unmodified jagged and spiky altitudes
 (mostly due to the GPS inaccuracies), resulting in a high gain value
  (+2535m);
 - In the middle, the noise reduction is on
“medium”, which is the default setting. Most noises are removed, resulting in a much smaller and less polluted gain value (+1717m); - On the right, the noise reduction is on
“big”. The profile smooth, with minors altitude changes lost, resulting in an even smaller gain value (+1634m).
![]() The first gain definition given above, gives an approximate under-estimation value of +1600m for this same track.
The first gain definition given above, gives an approximate under-estimation value of +1600m for this same track.
